Refashion??? You be the judge, some may say no since this shirt refashion is very similar to the original it started out as, call it what you want, refashion or just repair doesn't matter because I love it and my daughter gets extended wear out of a very cute shirt.
 |
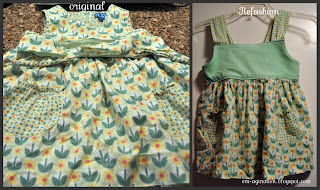
| Original shirt |
So here is the story, my daughter received this shirt when she was 4 1/2 as a gift and I immediately fell in the love with it, loved the fabric, loved the color, loved the style. I however was very sad after just a few wearings my daughter got a huge rip in the front of the the shirt. I decided that even though she couldn't wear it in it's current state, I would put it into my "to do" pile and refashion it into a skirt. Well my daughter is now almost 8 and the shirt still sits in that same pile. "Procrastinator," yeah, that is my, I admit it. This weekend I was going through said pile and decided I needed to either do something with it or throw it out. It was definitely to short to become a skirt but I thought, I may be able to let out the gathered bottom a little and add a coordinating fabric in place of the ripped fitted portion of the top and make it into a new top all together. Here is a little walk through on how this Children's Place shirt became this refashioned shirt.
First off you need to tear apart the existing shirt. I separated the gathered bottom from the fitted top. This shirt had a zipper which I also removed and saved for use in another project yet to be determined.
Next I used an existing shirt that fits to make a pattern for the fitted top cutting two pieces for the front of the shirt. Sorry I forgot to take a picture of this step.
I then cut a long rectangle that is 5 inches in height by 1 1/2 times the length of the front pieces. Fold over one of the long sides of the rectangle 1/2 inch and sew down. Then start shirring the back rectangle. If you haven't shirred something before, here is a great tutorial on shirring by
Ruffles and Stuff.
Then you need to attach the back shirred piece to one of the front pieces at the sides, making sure that the right sides of the fabric are together. Then press open the seams. Pressing seams is very important, it makes the difference between a professional looking garment and a wonky looking garment.
Now take your second fitted top piece and the top piece with the shirred back attached and put right sides together. Sew these two pieces together along the curved arms and the chest area as shown by the dotted line, I added those lines, they are not the sewn stitch, pretty cool huh? Yeah, I thought so too.
With the pieces attached, clip your corners and snip the curves before you flip it right side out. This will help to made the pieces lay flat and the edges to look very square.
With the top flipped so that the right sides are facing out, iron the fitted top part and top stitch around the curved arms and across the chess, making sure to leave the sides open.
This is what you should have so far.
Next take the gathered bottom of your original top and turn it inside out. Then turn your fitted top and turn it inside out and put it inside of the gathered bottom, pin and sew around so that you attach the two pieces, making sure that you only sew through one layer of the fitted top.
Turn the garment right side out and press this seam down. Now turn it inside out again and press the bottom edge not attached to the gathered bottom and the sides under a 1/4 inch and sew these pieces down, making sure to capture the gathered edge under the turned edge so that the inside looks nice and neat..
Next I cut the tie back pieces off of the original shirt and used these as straps for the new shirt. Sew in place and you are done. You could add button if you want, I still may.
Put the dress on and step back and enjoy your work, Here is my cutie enjoying her shirt again. Please feel free to link back to this post but please don't use my pictures without permission, especially those with my children in them. I know these steps may be hard to follow so if you have any questions, don't hesitate to ask.


I LOVE this!! Definitely an upcycle - you did a fantastic job and it looks like brand new!
ReplyDeleteI would love if you came over and linked this project to my weekly Round Tuit party at:
http://jembellish.blogspot.com/
I've also just started up a new page on my blog for upcycled clothes projects. It has a long term linky list on it for people to add their projects too - the idea being that I can build up a comprehensive resource for people to come to for ideas and inspiration for things to do with those loved but damaged or too small clothes!
I'd love if you linked this great project and tutorial there too - so more people can find it!
Have a great week!
Jill @ Creating my way to Success
Thanks for sharing such a useful information with us …. I like the way you describe the post with us.
ReplyDeleteAwesome post i really like this post and its information is really very nice and useful.
ReplyDeleteWholesale Branded Clothing
Wholesale Clothing Suppliers