Friday, May 27, 2011

Party with Flamingos


Oh what a week...we've had lots of activity going on in our house what with kid's sports. end of the season t-ball parties, end of the school year activities, doctor's appointments, I've been acting as a single mom since Mr. Smith has been away for work and oh yeah, I got braces (again) this week (what was I thinking, I forgot how painful braces were.) So yeah, busy is an understatement. Unfortunately, being busy leaves very little time for crafting. I did however manage to whip up a bunch of flamingo sugar cookies for my son's end of the school year party, it was a pink flamingo theme. Who knows why but it gave me an excuse to make cookies so I'm not complaining. They turned out really cute and the kids loved them. Here's to hoping there is more time for crafting this weekend. I hope you all have a fun weekend, I know I am looking forward to it.


Sunday, May 22, 2011

Subway Art My Way


My nephew is getting married in June and his lovely bride to be had her bridal shower this weekend. They had registered for some frames which I decided to get for them however I wanted to personalize one of them with something so I jumped on the subway art craze that has been all over blog land. Except I did it my way, this what happens when subway art meets a crossword puzzle.

Isn't that back ground paper cool, I just feel in love with it.
Looking at the subway art that is all over blog land got me thinking how did this art form that started out as graffiti make it's way into home decor? So I turned to google to answer my questions, I mean isn't that how everyone gets their questions answered in this day and age? I found this little essay that gave me some of the history behind Subway art. Long story short, subway art started as a way for graffiti artists to communicate, it then grew into a type of competition among artists to see who could tag the most subway cars. Soon graffiti covered so many cars that the artists began to search for ways to make their tags standout so they started using different styles of script and adding different doodles to make their tags unique. Ah ha, that makes sense, I can see how "subway art" has made its way from the subway to our homes. Enough with the history lesson, go get your "em-agination" going and make some of your own subway art, it's really fun.

Thursday, May 19, 2011

Applique Monkey Quilt


This is my first attempt at making a quilt, granted it is only an appliqued quilt which in my mind is much easier than what I think of as a more traditional quilt made by sewing little pieces of fabric together but I did quilt it which was huge for me. Stippling/quilting (not sure what the proper terminology is) is one of the things that I think makes a quilt a quilt and while my stippling was not perfect and definitely needs work, it was fun to do and it made me want to do more and improve.


For the monkey I free handed a drawing of a monkey hanging  from a tree branch and then cut  the drawing up into pieces for a pattern. I like the over all design of the quilt but looking at it now that it is finished, I wish I would have made the tree branch span across the entire quilt because as it is now, it just looks like the tree branch is floating in mid air which is a little weird.


The backing of the quilt is very cute, it is a bunch of little monkeys in different positions, with the words little monkey repeating. For the quilt top, I used a soft yellow with little white polka dots which are hard to see in the picture. It is all bound with a yellow and white striped fabric.


I am quite please with the quilt and it gave me the confidence I need to try my hand at a "real" quilt. I am thinking it will be a stacked coin quilt for my daughter. Wish me luck, especially since it will be a twin size quilt (this monkey quilt is a crib size) and I am going to try to quilt it myself.

Wednesday, May 18, 2011

Sailor Skirt for Me


Does anyone else have a fear of sewing clothing for themselves? I sure do! I'm not sure why, I guess it is just because I am afraid it won't turn out and I will have wasted time and fabric with nothing to show for it. Well today I decided to give it a try using some of the left over sheet I used to make these sailor pants for my daughter. I again turned to this tutorial from Me Sew Crazy for inspiration. I followed her tutorial for the sailor pants but instead made a sailor skirt.


To make the skirt, I simply used a skirt I love as a pattern and cut around it leaving extra for the seam allowance.  I then cut these pieces up the middle so that I had 4, 2 front and 2 back pieces just like in the tutorial. From here I followed the tutorial just as it is written to create the flaps for the sailor front.


For the back, I wanted a slit (I'm sure it has a technical name, I just don't know what it is) so I sewed the 2 back piece together stopping about 7 inches from the bottom. I then ironed the raw edges of the slit back 1/4 of an inch and sewed up one side of the slit and back down the other.


I then sewed all the pieces together and created the waist just like in the tutorial. The skirt turned out cute however my fear came true, I put the effort into making something for myself and it didn't fit. BOO! Which is why you are not seeing the skirt on me. I however know where I messed up and will give it another try, I just may have enough left for a take 2. Would you like to know where I messed up? Well, when I traced my skirt as a pattern, I added extra for the seam allowance for the side seam, I however didn't take into account the need to add in seam allowances for the seams that run up the middle of the front and back of the skirt.

I admit, not everything I make works or fits as the case may be. I however learned from this little mistake and will try again, this skirt is so cute, not to. What I need is a mannequin that is made to fit my body, I have seen tutorials on how to make them, I may just have to do that. I am determined to figure out how to sew clothes for myself. Have you had any failures when trying to sew something for yourself? Do you have any tips for me when trying to sew for yourself?  I'd love to hear about them.

Sunday, May 15, 2011

Jalapeno Salsa


Over the weekend Mr. Smith and I worked on a little project together. We made his favorite salsa, Jalapeno Salsa found in the Ball Complete Book of Canning, also found on Food.com. It is a really spicy salsa made with a ton of jalapenos but has a really great flavor.  We always double the recipe so that we can have lots on hand, it is that good.


Ingredients:


Yield: 3 pints
  • 3 cups chopped peeled cored tomatoes
  • 3 cups chopped jalapeno peppers
  • 1 cup chopped onion
  • 6 cloves garlic, minced
  • 2 tablespoons minced cilantro
  • 2 teaspoons oregano
  • 1 1/2 teaspoons salt
  • 1/2 teaspoon cumin
  • 1 cup cider vinegar

Directions:

  1. Combine all ingredients in large sauce pot.
  2. Bring mixture to a boil.
  3. Reduce heat.
  4. Simmer for 10 minutes.
  5. Ladle hot salsa into hot, sterilized jars, leaving 1/4-inch head space.
  6. Adjust 2-piece caps.
  7. Process for 15 minutes in boiling-water canner


I had fun prettying up the jars a little. I started out by using the canning templates found at Merriment Design, they are so pretty. I however wanted to put them on the front of my jars rather than the top of the lid so I copied and pasted them into Paint and then stretched them into an oval shape. Very pretty and ready for some gift giving, if I can pry them from Mr. Smith's hands. Maybe we should have tripled the recipe instead of doubling it.

Yes I know I spelled Jalapeno wrong, I  vote we change the spelling because I would have sworn this was right.


Wednesday, May 11, 2011

Balloon Pillars - Great Party Decoration


I saw some balloon pillars at a party a long time ago and decided I needed some of my own to use for various parties we have through out the year. They are so versatile and you can use them to fit any party decor, you are only limited by your "em-agination." Here is how to make them.

First off, you will need a pillar and a circle for the base. For my pillars I used some hallow plexiglass tubing and for the base I used a plexiglass circle. I wanted something that was sturdy and could be used again and again, plus I liked that I could integrate different things into the tubing to carry the color or theme all the way through. Each stand cost me less than $5.00 to make but you could  make them cheaper using a dowel and wood circle nailed or glued together and painted. Or even cheaper, I am sure that a wrapping paper tube or mailing tube glued to a card board circle and painted would work also.


As you can see, I put some glass marble things in the bottom of the tube, this was mostly to weight down the structure because the last time I used them they were outside and I didn't want them to blow away, they are pretty light. I also ran a blue star ribbon up the center of the tube just to add some intrest. Depending on the theme, you could put lots of things in the center of the tube, I have put silk flowers in the middle, candy, even twinkle lights (this of course will only work if your tube is hollow and clear like mine.


Once you have your pillar, you need to blow up 9 balloons to but on the top, you can do all one color or use a variety. Take 2 of your blown up balloons and tie them together until you have 4 pairs.


Take 2 of your pairs and push them together and then give them a twist so they don't come apart, as you can see from the pictures, the dark blue balloons and the light blue balloons were right next to each other when I pushed them together but once I twisted them they were opposite each other, hopefully this helps you envision the twisting action. Set these 4 balloons aside and make another grouping with the 2 remaining pairs of balloons.


Next take one of the groupings you just made and slide it over the pole, again I twisted the balloons to secure them onto the pole. Then take your last group of balloons and slide them onto the top of the pole so that they rest on top of the balloons you just put onto the pole, you can also twist these balloons to secure them if you want.


At this point you should have one balloon left, take this balloon and place it on top in the center of of all the balloons, securing in place by twisting the part you tie around the base of another balloon.


Next you can fancy it up a bit, I used curling ribbon which I wove in between the balloons and let hang down but you could do anything, I have used the same wired star garland that runs in the center and made curly ques that stuck out between the balloons, I have put silk flowers and tulle between the balloons (bridal shower) and even different pennants (baseball theme) sticking out, like I said you are only limited by your "em-agination."


Also, I don't do this with mine but if you wanted to cover your base, you could use small balloons, like a water balloon size and do the same thing you do on the top, at the bottom, obviously putting the balloons on the bottom first. I hope you'll try to make one of these for your next party, you are sure to get lots of compliments, I always do (mostly people asking how to make them,) now you all know.

Sunday, May 8, 2011

$1.80 Polka Dot Dress Refashion


I found this woman's shirt on clearance at Kohl's last summer for $1.80, yes, you read that right, $1.80. Even though there was no way I could ever wear this shirt, I am just to old and not skinny enough, I knew I could refashion it into a dress for my daughter and who can pass up a dress for $1.80, not me that is for sure.


This was a fairly straight forward refashion and could really be done with any t-shirt you have, First off, this shirt had a shelf bra sewn in which my daughter didn't need so I cut that out. Then I marked along the side seams where I wanted to take in the dress a little. After cutting along the line, I pinned the sides together and sewed up the seams.

Then I cut along off the scooped neck and straps creating a straight edge at the top. Fold over a 1/4 inch and sewn creating a finished edge.

After sewing the finished edge, I noticed that the fabric had stretched slightly and just didn't look right so I decided to shir the top edge of the dress a little bit to match the existing shirring below. You could put in as much shirring as you want, I only did 2 rows.


For the sleeves, I had wanted to reuse the spaghetti straps that were originally on the dress however I am not  a huge fan of little girls in spaghetti straps, it just looks to grown up to me and when pinned in place it just didn't grab me so I decided to make a little ruffle sleeve using the fabric from shelf bra I had cut out of the top. The ruffle sleeve was cut out in a half circle, making sure to cut it larger than I needed because the shirring along the sleeve will bunch up making it a smaller. I shirred 2 rows along the flat edge of the sleeve and then pinned these sleeves to the top of the dress with the curved edges facing out.


At this point the construction of the dress was done, you could leave it this way and the dress would be cute. I however couldn't leave well enough alone and decided I needed to spruce it up. Out came my favorite crafting tool, the Silhouette craft cutter and some heat set vinyl. You could really do anything to spruce it up, I thought flowers along the bottom would be cute, but in the end polka dots won out, I just love them.

I wasn't able to get my daughter to model it for me, she was asleep but I bet a million dollars she asks if she can wear it to school tomorrow. Fine by me sweetheart, fine by me.

Please feel free to link to my posts but please do not repost pictures of my children, thank you.

Friday, May 6, 2011

At Last...The Pillow Animal Tutorial


Awhile ago I showed you all the pillow animals I made for my kids and I promised a tutorial on how to make them. I finally got around to writing a tutorial on how to make them. I hope that my directions make sense, if you have any questions, don't hesitate to ask. I originally made a ladybug, a turtle and a penguin, for this tutorial I made a dog. The steps on constructing each animal are the same, the only thing that will differ is what color fabric you use and the different decorations that make up each animal.


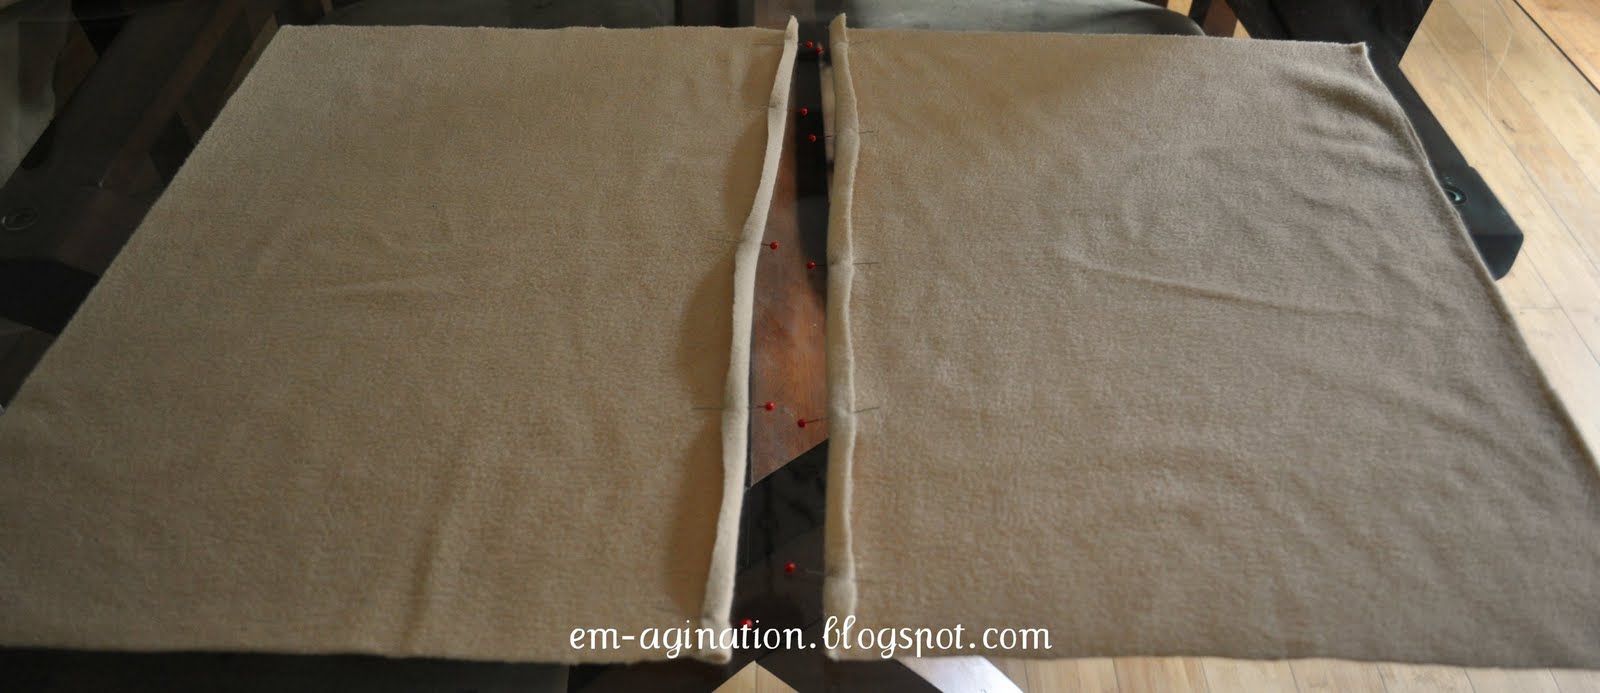
First off you are going to make the cover for the pillow, to do this lay your pillow out on your main color of fabric, in this case tan, (this will vary depending on the animal) and cut out a rectangle that is slightly bigger than the pillow to allow for seam allowances. I used a standard size pillow for a twin bed so my rectangle measured 27 x 20 1/2, this will be the top of your animal. Next cut another rectangle that is slightly longer mine measured 30 x 20 1/2, this will be the underside of the animal and is slightly larger because we are going to cut this in half so that we have an opening in which to insert our pillow or remove or pillow to allow for washing.

As I said, you are going to cut the larger rectangle in half so that you now have two rectangles that measure 15 x 20 1/2. Then you will hem one 20 1/2 inch side on each of the small rectangles about 1/2 an inch. Then put these aside for later.


Next we will work on adding details to the top of the animal, the dog is fairly simple, I added a contrasting brown to the four corners to act as the feet and added a spot to the back which will eventually have a tail. To make the feet, I cut out 2 squares of brown that were an appropriate size for the corners of my rectangle and then folded these diagonally and cut across thus making 4 triangles for the feet. For the spot near the back, I just free formed a spot that I thought fit the size of the pillow, just make a spot you like.


You then are going to pin the feet to the four corners of you animal top and your spot near the back of the animal, approximately where a tail would be. Then you are going to sew these onto the animal top, I did more of an applique stitch to attach my pieces using a zig zag stitch with both the stitch length and width being very small (I think on my machine the width is set to 2 and the length at 1), if you are using fleece like I did, you could just use a straight stitch also since fleece doesn't fray. When attaching the feet I also only stitched along the diagonal part of the triangle, there is no need to stitch the other sides of the triangle because when we finish the pillow cover, they will be captured with the seam thus locking them in place.  For other animals the details may be more but may be less depending on the animal and your preference on how you want the animal to look, the penguin for instance is a solid black, no other detail really. The ladybug I added some black dots and the turtle which was the most labor intensive had a hexagon and triangle pattern on the back.


Once you have your details sewn to the top of the animal, we need to make the straps that will keep the animal folded when not being used as a pillow. For the straps, you need to cut out two rectangles that measure 3 1/2 x 4 1/2 of the main color of your animal, for this dog it is tan, but may differ depending on the animal you are creating. Fold and pin each of your rectangles in half so that you now have 2 rectangles that measure 1 3/4 x 4 1/2 and sew around two of your sides leaving one of the 1 3/4 sides of the rectangle open for turning.


With your straps done, we are going to assemble the pillow cover for you animal. Take your animal top (the one with details) and lay it on your work surface right side up. Next take your straps you just made and place them in the middle each of the 20 1/2 inch sides so that the raw edge of the straps meets the raw edge of the pillow top. Then lay your two smaller rectangles right side facing down on top of the pillow top and straps, overlapping the finished so that the unfinished edges are equal. Then using a straight stitch, sew around all four sides of the pillow cover. Then clip the corners making sure not to cut the seam, this will make for nice square corners. Turn your cover so that the right sides are now facing out and admire your work.


zig zag stitch with a small length and width setting and free formed the mouth, you could also make the mouth with some chalk or something if you want more of a guide on where to stitch.


Once all of your facial details are in sewn in place take your other circle and cut it in half, then pin these halves to your face, right sides together and sew around the entire circle. You could skip the cutting of the circle in half and just sew the two circles together if you wanted but I prefer to cut them in half because it makes it easier to stuff and allows me more flexibility to shape the face rather than having a perfect circle. Then turn your head right side out and stuff it really tightly with some fiberfill. When it is really firm, close up the back of the head with a whip stitch using a needle and thread.


For the dog, we now need to make the ears and tail. Again I just free formed what I thought looked like ears, using an elongated egg shape and cut out two, these egg shapes probably measured 3 x 4 (4 inches being the widest part of the oval). I then cut off the smaller edge of the egg shape and folded it in half, right sides together and sewed around the oval, leaving the top straight edge open so that I could turn right sides out. Then you need to fold the raw edges at the top, down so that they sit inside of the ear. At this point you can pin them to the head where ever you think they look good, then whip stitch them into place using a need and thread.


For the tail I cut out tow rectangular shapes with a curve at the end, or maybe it could be described as a half of a "C". Just as you did with the ears, you are going to pin right sides together and sew around the edges leaving and edge open for turning. When right sides are turned stuff the tail with a little fiberfill and then sew the opening closed using a needle and thread.


We are almost done, yeah!! Now we need to attach the head and tail to the pillow cover or body. I have found that the best way to do this is to hand stitch them into place. Essentially what I do place the head about and inch or two above the seam created when sewing the top and bottom of the pillow cover together and then whip stitch it into place using a very small stitch so that you don't see it. Making sure to stitch from one side of the head to the other. this will also help to cover that seam along the back of the head. If you find that your head is to heavy and it is hanging down rather than looking out, you can tack the head back a little higher onto the pillow cover. For the tail, you will do the same thing, hand stitch it into place using a small whip stitch.


Lastly we need to attach Velcro to our straps, this will hold the animal in place when not being used as a pillow. This is pretty straight forward, you are going to cut a piece of Velcro slightly shorter than your straps and sew then onto your straps. The only tricky part is you want to place one side of your Velcro on the underside of one of your straps and take the other side of your Velcro and place it on the topside of your other strap, so that when you fold your pillow in half, the two sides of Velcro will meet. Get it? Got it? Good!!


Yeah you are done, insert your pillow form into your pillow cover and you have created your very own pillow animal. Again if you have any questions, please ask, I would be happy to help. If you see anything missing from this tute, let me know, I wrote it very late at night so you now how that goes. If you make one, send me a pick or a link, I would love to see it.