Wednesday, March 30, 2011

Indiana Jones Birthday

My baby turned 6 last week, how did that happen? It seems like just yesterday I was holding my baby and then poof,  he was 6, not sure where all those years went but they were gone in an instant. No matter how much I wish he would stop growing, he simply refuses so I guess we will celebrate and celebrate we did. To say my son is a fan of Indiana Jones is an understatement so it was not hard to decide what type of birthday party we would have. To start I came up with a simple invitation featuring Lego Indiana Jones that we passed out to my son's classmates. To make these invitations, I used some clip art of Lego Indiana Jones in the corner and downloaded the Indiana Jones font for the wording then to make them look old and add interest, I burnt the edges of the invite. Pretty cute and pretty easy that is the kind of project I love.


For the party, I decided that every good archaeologist needs to know how to discover treasure so I hid a bunch of it the sandbox and let the kids at it to find as much as they could. The kids however need a place to store their treasures so I decided to make each of the kids a satchel, like Indiana Jones uses to store their treasures in. These bags were really easy and really fast to make. I made 15 of them in about 1 1/2 hours, so yes, very easy.


First off, I cut a rectangle out of brown felt that measured 10 by 20. I then cut little notches out of the 20 inch side a little more than 1/3 of the way up. These notches measured about 1 by 2 inches.


I then folded the bottom of the bag up so that the notches were folded in half and sewed each side of the bag up.


I then pinched the notched area together so that it formed a flat bottom to the bag and sewed the corners.


Then you will flip the bag inside out so that the seams are on the inside.


For the handle, I cut a 2 by 32 inch rectangle out of felt and attached it to opposite sides of the bag. Then fold the top flap over and tada, you have a down and dirty satchel, perfect to hold treasure.


Lastly and maybe most importantly we needed a cake. I wish I could claim responsibility for this part but I am just not talented when it comes to decorating cakes however my mama is excellent and is always willing to make my kid's birthday cakes. If you have time you should check out her blog to see some of the wonderful cakes she has made. http://cakesbyjanet.blogspot.com/

All in all a fun time was had by all, the treasure hunt/dig was a hit, cake was enjoyed, and smileswere flashed. Happy Birthday to my baby, I am so blessed to have you as my son!

Friday, March 25, 2011

Mickey Checkers


We are back from our surprise Disney World Vacation and what fun we had!!! I intended to post this last Mickey themed craft while on vacation but we were so busy having fun that, that didn't happen, so you get to see it now. It is a variation of the tic-tac-toe on the go game I posted a while back but instead of the game board being on the back of the game pouch, I had to make a separate fold-able game board because the checker board was just to big to fit onto the back of the pouch.


The game board was made by cutting out 1 inch squares of freezer paper using my favorite crafting tool the Silhouette Craft Cutter and then laying them out in the checker board pattern. I then ironed the freezer paper squares down on to a red fabric square which measured about 8 1/2 by 8 1/2 and used fabric paint to paint in the checker board. Once the paint was dry, I peeled off the freezer paper and where the freezer paper was the red fabric showed through leaving a perfect checker board. I then cut another piece of fabric the same size as the checker board and sewed them together and finished it off with a cute little fabric border.


For the game pieces I bought unfinished wood stars at Jo-ann's and painted them with acrylic paint. When they were dry, I added little Mickey and Friends stickers to one side of the stars and painted over the whole star with Modge Podge to seal.

The pouch or envelope to hold the whole thing was made by following this tutorial with one change, I didn't use the plastic on the front and back like in the tutorial, instead I used the plastic only on the front and used fabric on the back. The checker board is then folded and put inside the pouch along with the game pieces just waiting to be played with.

Friday, March 18, 2011

Mickey and Friends Autograph T-shirt


We are in Florida right now visiting Mickey and his friends. We surprised our kids with the trip, not telling them about it until the day we left, such a great surprise. At Disney World, collecting all the character's autographs is a big part of the experience but I didn't want to be bogged down with carrying around autograph books for each of my kids so I thought, why not make an autograph t-shirt that way they could wear their shirt while at Disney World and also afterwards as a reminder of what a fun time they had and as an added bonus, we don't have to worry about setting down the autograph books and loosing them, kind of hard to lose the shirt off your back though it can be done, just ask my hubby about that (thank you by the way.)

Here is a quick how to on how I made them. I started out with a blank t-shirt I found on sale at Jo-ann's, they were on sale 5 for $10.00 so I picked up a few.
I then used my favorite tool, the Silhouette Craft Cutter to cut out the graphics. What I love about the Silhouette is that it will cut out any true type font and I can download a ton of them for free which is how I got the Disney font on mine. I just googled Disney font, saved it to my fonts file and then opened up my Silhouette program and like magic, there is was. For the Micky silhouette, I found a picture of Mickey's head, saved it to my computer and then opened it up in my Silhouette program. Once here, I selected the trace image tool, highlighted the image and again like magic, Mickey's head was traced and ready to cut.


After I had designed my t-shirt just the way I wanted I sent it to be cut. You could either cut it out of iron on vinyl or use freezer paper and fabric paint to make these. I was out of vinyl so freezer paper it was. A little tip because it took me forever to find the freezer paper at the grocery store, mine carries it in with the canning supplies, I know some have it with the wax paper and aluminum foil but mine does not.


Once it was cut and  my freezer paper stencil was ironed on, I used a sponge and painted over my stencil. Make sure that you put something on the inside of your shirt so the paint doesn't bleed through, I used cardboard from and empty cereal box. Let this dry for 24 hours and then heat set it with an iron. I then let my "em-agination" run wild with my daughter's t-shirt and "Minnie-fied" it, (I know this isn't a real word but who cares) adding some felt flowers and rhinestones over one of the ears. So cute! My son's is pretty cute also but a little boring if you ask me.


I'll post pictures of the autograph tee's when we get back and hopefully they are all filled up with lots of autographs!

Wednesday, March 16, 2011

Mickey Bows

We are hanging out with the mouse this week, "Mickey Mouse" that is. We totally surprised our kids with the trip, they had no idea we were going until we picked them up from school yesterday to go to the airport, so much fun. I however had so much to do to get ready which included making a few Mickey Mouse themed items which I will feature over the next week. First up "Mickey Bows" to find out the general directions visit this post from last week. The only thing I did different was to use a red button in the center which makes the corkscrew ribbon fan out a little more. I attached them to the barrette form the exact same way as in the directions. One great tip to get your "em-agination" flowing is to use a sticker inside of the button to achieve a specific theme. The button I used was a plain old cheap button but to give it a little more flair and a true "Mickey" theme, I put a Mickey sticker right in the center of the button and used a little modge podge to hold it in place. "Em-agine" the possibilities you could come up with, flowers, animals, cartoon characters, if you can find a sticker, you can make a what-ever themed bow.

Monday, March 14, 2011

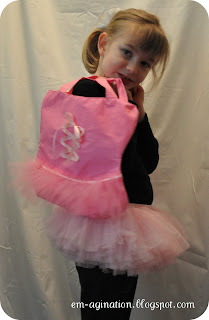
Ballerina Tutu Bag

A few years ago a friend of mine was telling me about a bag she saw at one of her daughter Maya's ballet classes and after describing it to me she asked if I thought I could make it. I thought sure, I wish I had been able to look at the bag in person to get a better idea of what I would be making but she told me it was a bag that essentially looked like a little ballerina leotard with a tutu. With that description I set out to make a bag for Maya that looked like the one they had seen. My first attempt, I thought was very successful and it was wrapped up and delivered to cute little Maya for her birthday, never to be thought of again.  Fast forward to last week when I was cleaning/organizing  my stash and I came across 2 extra outer pieces I had cut for the bag and I remembered oh, that was a cute bag, I should make another one and blog about it so that is what I am doing.

I am sorry I don't have the time to write up a tutorial and post a pattern right now, we have a huge surprise brewing at our house this week that has taken up most of my time but I will if there is enough interest. So leave me  a comment if you would like a tutorial and I will contact you when it is ready or better yet, become a follower and then you will be sure not to miss it when it is done. Stop back by on Wednesday if you want to know what our super huge surprise is, there are a few crafts that are associated with it. Trust me it is a big one!

Friday, March 11, 2011

Corker Bow Barrettes

Have you ever seen hair bows for little girls and thought, wow those are cute but expensive for something made mostly out of ribbon that will inevitably get lost? No? Well maybe it's just me, remember I am frugal. Yes, frugal but definitely not willing to give up style. So when my daughter was old enough to start wearing bows in her hair, I decided I needed to find out how to make them. That was nearly 6 years and many bows ago. They are easy and fairly quick to make and now that my daughter is older, she makes them on her own with the exception of using the oven, that I help with. I wish I could remember where I learned to make these, but I can't. I definitely can't claim that I came up with the idea because they have been around a long time, this is just how I make them.

Here is what you need:
  • ribbon
  • dowels or pencils, whatever you may have
  • clips
  • barrette blanks (found at the craft store in the jewelery making section)
  • needle and thread
  • felt
  • hot glue gun and glue
First preheat your oven to 250 degrees, then secure your ribbon with a clip at one end of the dowel and wrap the ribbon up the dowel securing at the other end with another clip. When you have made a bunch of these, put them on a cookie sheet and bake them for 30 minutes.
When they are done baking take them out of the oven and let them cool. When they are cool you can take them off the dowels and like magic, they will hold that corkscrew shape. 
Now for how to make them into those cute little bows. Cut the ribbon to any length you want I usually cut mine into thirds. 
Next you need to heat the ends over a flame, this will make them melt slightly, preventing them from fraying.
Then you will find the middle of your ribbons and thread them onto a needle, piling them one on top of the other making sure that you are going through the pile of ribbons a few times to hold them into place. (I just have to tell you, I love photo editing software. Ha ha, you see the photo above, I had a dirty fingernail in it, yep I admit it but through the magic of photo editing, I was able to give myself a french manicure, gotta love it.)

Great you ask, now what do I do? Well, from here you can attach them to a barrette like I did or you can put them onto a clip or a pony tail holder. I'll show you how I attached them to the barrette from.
Take a piece of felt and cut out a rectangle that is about three times the width of your barrette and slightly longer than your barrette.  Then you are going to cut notches out of the four corners so that you can wrap them around your barrette. 

Take your corker bow and and attach it to the center of your felt using a needle and thread. Lay a bead of hot glue down the inside center of your barrette and wrap one side of felt onto this bead of glue. Lay down another bead on top of felt you just folded over and fold over the opposite side of felt being sure to push down hard. (I removed the center loop to put the bead down and then replaced it when I was done.) Then put a drop of hot glue on the short ends of your barrette and fold over the short tabs onto the glue. I really should have taken a picture of these steps, I just plain forgot.
Turn over and admire your cute new bows. Use your "em-agination" and make these your own, add a button to the middle, add a sew on jewel, really anything. These would also be really cute on a gift instead of a bow. 

Wednesday, March 9, 2011

Drum for Kids

Those who know my family, know that we are very musical. Let me clarify, everyone but yours truly is musically inclined. My cute hubby is a drummer who actually plays in a local band known as "Over the Edge" who also dabbles in tickling the ivories from time to time. My oldest son is also a drummer who has played a couple of shows with his band "Asylum." My daughter is learning to play the piano and is very good, not that I am biased or anything and if you ask my youngest son who is 5, he will tell you that he is also a drummer. What can I say music runs in their blood. With so many musicians in the house, we have quite a few musical instruments laying around but as you can imagine, little hands are not always welcome to play these instruments so today my son and I decided to make a drum that was all his own. "Woo hoo oh yeah!" to quote my son when we were all done. It is a quick and easy project.

Here is what you need
  • 1 embroidery hoop
  • Ripstop Nylon (I bought 1/4 yard which is enough to make several drums, depending on the size of hoop used)
  • Heat gun or blow dryer
  • Glue (I used Elmer's, oops, I forgot it in the picture)
  • Paint (optional)
                                      
To make this drum, cut a square of fabric that is larger than the hoop.
Place a  line of glue on the outer rim of the inner hoop and a line of glue on the inner rim of the outer hoop. Am I the only one confused by that direction? Basically put glue on that parts that are going to sandwich the fabric.

Lay the fabric over the inner hoop, push the outer hoop around the inner circle and tighten. Pull the fabric that is sticking out of the hoop so that it is very taught and try to tighten the outer circle somemore.

Now take your heat tool or hairdryer and pass it over the fabric. As the fabric heats up you will see it tighten and smooth. Then turn over the hoop and do the same thing.

Trim the excess fabric from around the hoop. Ripstop nylon tends to fray so you make want to take your heat tool around where you cut, this will cause the fibers to melt slightly and stop the fraying.

On to the fun part...the part where you get to use your "em-agination." Take out your paint and decorate that bad boy however you want.

Hand it over to you child and listen as they get their groove on.
Please feel free to link to this post but please do not use my pictures without my permission, especially those with my children in them.