Wednesday, June 29, 2011

T-shirt Refashion


I was shopping at Old Navy the other day when I noticed that they had men's t-shirts on sale for $3 a piece. I thought, you can't beat that price so I picked up several in the largest size they had, to do a few refashions for myself and my daughter. Using a t-shirt and some cute trim I picked up at Jo-Ann's on clearance I came up with this cute tunic length tank-top. It was super easy to make, here is how I did it.


Start with your t-shirt, I used an XXL t-shirt, though to big, it provided the length I wanted for a tunic length shirt and with a few well placed gathers, it was flowy enough for a loose fitting summer shirt.


Cut the sleeves off the t-shirt, just outside the seam of the sleeve.


 Cut the neck off the shirt, just below the neck hole opening.


Turn under the arm holes and sew so that you have a a finished edge.


Using a basting stitch, sew two rows of stitches on both the front and back of the shirt about 4 inches from each side and 1/4 inch apart. Then pull the bottom threads of each row so that gathers are created. As you can see, I gathered the back of my shirt more than the front of my shirt.


Take your trim and measure out two lengths slightly longer than the top edges of the front and back of your shirt. Fold over the edges of the trim to create a finished edge and sew trim into place.


Measure the length of trim needed to create the straps of your shirt, pin into place and sew.


Yahoo!!! You are done, wasn't that easy? Now to plan what to do with the remaining shirts I bought.

Thursday, June 23, 2011

Red White (sort of) and Blue Push-up Popsicles


The kids and I have been trying to keep busy this summer which has left little to no time for crafting by me but we are going to try and make something in the kitchen each week this summer and the first thing we made were these red, white (more of a yellow but who cares) and blue push-up Popsicles. We used these pretty cool push-up molds that have been popular for making push-cakes but we use them for Popsicles more than push-cakes. If you are interested, you can buy some molds from me by checking out my ETSY shop.

Here is what you need to make these Red, White and Blue Push-up Popsicles.

Red Layer:
1 1/2 cups of cut up strawberries
1/3 cup water
3 tbsp. sugar

White Layer:
1 package of vanilla pudding mix
2 cups of milk

Blue Layer:
3/4 cups of blueberries
1/3 cup water
3 tbsp. sugar


To make the red layer, wash and cut up your strawberries. Combine strawberries, water and sugar in a sauce pan and cook until strawberries release their juices and become mushy and break up easily. Let cool slightly and pour this mixture into your Popsicle molds about 1/3 of the way up. Freeze


Once the red layer is frozen, make the white layer by mixing the pudding mix and milk and pour into you Popsicle molds that have the frozen strawberry layer. Put back into the freezer and freeze until white layer is frozen.


While the white layer is freezing, make the blue layer by combining blueberries, water and sugar in a saucepan. Heat until the berries soften and become mushy. Using the back of a fork or a blender if you prefer a smoother texture, smash the berries until they form a sort of puree. Let the blue layer cool while the white layer freezes and then pour the blue layer on top of the white and red layer. Put the molds back into the freezer until the blue layer freezes and then they are ready to serve.


These little babies would be very fun and festive to serve for the upcoming holiday.

Thursday, June 16, 2011

Cleaning out Crafting Supplies


My crafting supplies are out of control so while I was crafting today I decided to try and use up some of the supplies in my desk that have been sitting there for quite a while (some a couple of years). I came up with this necklace which is funny because I don't wear jewelry though I keep telling myself I need to try and wear it, it just feels odd when I do and I just end up fidgeting with it which is never a good thing. Is wearing jewelry something that you eventually just get used to or does my uncomfortableness with it just mean I am not a jewelry person, who knows, it was still fun to create and I am sure I can find someone to give it to if I don't use it.


The supplies I used included faux pearls (bought to add to a wreath that I ended up not using) pendant (bought to add as a decoration on a handbag I was going to make but never did) ribbon (left over from who knows what project) and a sewing needle (a staple in the crafting supplies.)


First I measured the ribbon to the length I wanted and strung the pendant to the half way point. I then strung one pearl onto both sides of the ribbon.


Next, I measured 2 inches above the pendant on each side of the ribbon and tied a knot. Then I strung a pearl on both sides and tied another knot above the pearl to hold the pearl in place. Continue with this pattern on each side of the ribbon until you have filled it up. At this point you could add a clasp if you had one, I did not so I just tied a bow.


Finally, if you are me, go and try to enjoy your new necklace, or let it sit in your jewelery box which is probably what will happen with this baby.

Monday, June 13, 2011

Wreath Addiction


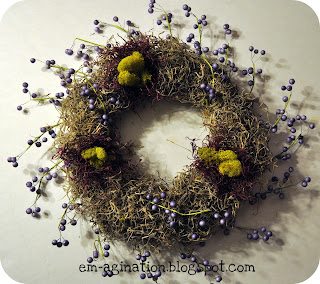
It's that time again! I was getting bored walking into the house looking at this wreath so I made a new one. This time using my favorite colors, purple and green. And I luurve it! These pictures don't do it justice.


I used my go to standards for making wreaths on the cheap,  the base, a dollar store Styrofoam wreath covered with Spanish moss again from the dollar store and floral pins to hold the moss in place.


Once the wreath form is totally covered with the moss, now start adding things to pretty it up. On my last trip to Micheal's I found a bag of fun decorative moss in shades of green and burgundy/purple (not sure what to call that color) I also found a garland of wispy purple berries. All which equaled inspiration for my new wreath. The garland is affixed to the back of the wreath form using floral pins. This made the wreath a little larger and added a different texture to the wreath. Can't wait to hang it on the front door in the morning.

Tuesday, June 7, 2011

Teaching Kids to Sew


I think teaching kids to sew is such a valuable skill to learn. My daughter loves to sew and I often get asked, how did you teach Kylee to sew? I began to teach her to sew when she was about five years old with basic hand sewing using scraps of fabric. By the time she was 5 1/2 or 6 I started to teach her how to use my sewing machine. The sewing machine can be scary so we took it slow. The nice thing about my machine is that it has a speed dial so that I can slow it way down to make it not so scary and uncontrollable. If you are going to teach a child to sew, this is a very nice feature to have but not necessary. In our house the rule is, if Kylee is sewing, the speed must be set to turtle (slow)


First Kylee started out simply sitting on my lap and pressing the sewing pedal while I controlled the fabric. She played around and quickly figured out that the harder you push, the faster the machine goes and vise versa. We then graduated to her lifting and lowering the presser and then pushing the buttons to make the needle go up and down and go in reverse, I explained all the parts of the machine to her and always asked her to tell me what to do before she did it. We talked about safety and that the needle is sharp and that she must keep her fingers away from the needle. Another nice feature of my machine is that it has a button that tells the machine to always keep the needle down when you are not pushing the pedal, this helps prevent any accidental needle poking, Another rule when Kylee is sewing is that the needle must be set to the down position.

When Kylee was able to tell me the steps needed to safely sew something I started to let her guide the fabric while she sat on my lap. Eventually she graduated to me just sitting next to her while she sewed on her own. For what seemed like hours, she practiced sewing straight lines, that I had drawn onto fabric. When she could sew a straight line very well, I started to draw out curved and wavy lines onto scraps of fabric which she practiced over and over again. We then made small things like pillows and blankets for her dolls and stuffed animals and Kylee became very comfortable using my sewing machine. Today Kylee who is almost 8 uses the machine all by herself, I am in the room of course usually making dinner or doing dishes but she sets it up and sews all on her own with very little assistance.


Today, Kylee drew out a little bunny rabbit onto some scraps of felt and created this little softy. Isn't it cute.


I still sometimes draw a dashed line to help guide her as to where to sew because she has a hard time understanding how to keep a consistent seam allowance and this little guys had a lot of curves so the drawing of a dashed line was helpful for her so she could see and anticipate what she needed to do next.


You can see she did fairly good following the line. Often what happens if she doesn't have a line and is sewing around a curve is that she ends up very close to the edge and when she turns the fabric, there is a hole. With the dotted line, this rarely happens and sew sews much neater and straighter.


The bunny was then turned right side out and you no longer can see her drawing lines or the dashed sewing guides.


Kylee stuffed the little bunny and used her hand sewing skills to close up the bunny. She had me sew on the button eye and the whiskers while she made a little pom-pom that was sewed on for the tail.

I love the fact that Kylee has the ability to create something in her head and then produce it into a tangible item. We haven't started talking about patterns yet and how to use/read them but she has made this one of her summer goals so we will probably start learning about patterns by making a few simple skirts. Even my youngest son is interested in sewing and will begin learning how to sew using a sewing machine this summer. His first project, if you ask him is to make a sword. We will see how it goes. 

Sunday, June 5, 2011

Patriotic Potatoes


What a great weekend we had here in Oregon, we broke 80 degrees for the first time this year and my family spent the majority of the time outside. The kids had softball and t-ball games, my oldest spent the majority of his time at the skate park. I got my vegi garden planted yahoo, Mr. Smith fixed the sprinkler system which he mangled with the rototiller last year and we went to the local farmers market. I love the farmer's market and our area has some really great farmer's markets. I picked up some baby (and I mean baby, probably no bigger than a jumbo marshmallow) potatoes in various colors, red, white and blue. Well, you can't buy red white and blue potatoes and not do something patriotic with them so I present to you, Patriotic Potatoes.


These make a really fun, easy side dish, do you see the American flag? Yes I know I didn't quite get it right, the corner should be blue with red and white stripes, but I bought more blue potatoes and only a few red so I didn't have enough to make a proper American flag but you get the idea. My kids thought making an American flag out of potatoes was fun and they liked helping squish the potatoes also.  To make these, all you need are red, white and blue potatoes, (any color will do but check out your farmer's market they just may have some blue potatoes) Then after you have washed them, cook them in the microwave until they are soft. Then put them on a baking sheet and take a glass cup and push on the potato with the bottom of the glass until the potato smashes. Then dot the potatoes with a little bit of butter and sprinkle with salt, pepper, and garlic powder. Bake at 375 degrees until they start to brown. My kids like to eat them with ketchup, I prefer mine with a dab of sour cream.


As they bake, the skin sort of hardens and holds everything together so they would be great as finger food at your next party. You could sprinkle them with a little bacon and cheese and topped with a dab of sour cream and chives, sort of like potato skins but way less work. Give them a try, I bet your family will love them.

Friday, June 3, 2011

Cottage Apron


The book, "One Yard Wonders" has been around for awhile, heck I have had it for about a year and I am just now getting around to making something out of it. It is a great book with some really neat projects. I love the premise of the book, everything in the book can be made with one yard of fabric or less and for the most part everything is fairly easy to make.  It is just a great book that really makes sewing seem like something that is doable for everyone. Check it out if you haven't had a chance.


For the first project I made out of the book, I chose to make the "Cottage Apron." I was asked to make an apron for a friend as a birthday gift. My friend wears aprons a lot, mostly the boring square type aprons that are solid in color, very boring. So I thought I would spice up her apron wardrobe I wanted to make an apron that was more exciting than the typical apron but not so flashy that she won't want to wear it, the cottage apron fit the bill. I hope she likes it.

Wednesday, June 1, 2011

Doggy Leash


Our doggy leash broke the other day, Mr. Smith took our dog for a walk and let out the leash only to find that it no longer retracted like it was supposed to. We can't complain we have had our dog for almost 10 years and owned the leash just as long so I suppose we got our monies worth. I however saw the clasp and thought, that is still perfectly usable so I got to work making another doggy leash rather than going out to buy another.


I used some left over fabric I had laying around in my stash. I wanted to make a cute colorful leash since our dog is a girl but was stuck with manly neutrals since Mr. Smith does the dog walking in our house. Oh I go along for the walk sometimes but I am not the walker because the walker is responsible for picking up after their dog and I don't pick up what dogs leave behind. It's not because I am prissy or anything, I just have a gag reflex that doesn't stop which means I too would leave something behind if you get what I mean.


To make the leash, I cut out strips of fabric that were 2 1/2 inches wide and various lengths. I then sewed all the pieces together until I had one long piece of fabric that was 2 1/2 inches by about 7 feet. I then pressed all the seams open and ironed on some thin interfacing, mostly to give the leash some added strength. I then folded the long strip of fabric in half and pressed.


Back to the sewing machine where I sewed along the short side of the fabric and up the very long side, leaving one short side open for turning. Let me tell you the turning was a pain in the rump. Every time I came to one of the seams, the tube would get all bunched up, I think because it was just too much fabric for such a small area. After working it for quite a while though, I was able to get the fabric turned right side out. then iron your tube again so it lays flat.


For the handle, I just folded a loop about 7 inches long and secured it using several rows of stitching. I did the same to attach the latch to the other end of the leash. Only time will tell if this leash will last as long as our previous leash but even if it doesn't, I can just whip up another leash in a jiffy, only this time I plan to use only one long strip of fabric instead of a bunch of pieces, I am telling you turning that tube right side out was an incredible pain and I am going to make it girly, I don't care if Mr. Smith doesn't want a hot pink. ruffly leash, he is getting one.