Showing posts with label sewing. Show all posts

Thursday, May 19, 2011

Applique Monkey Quilt


This is my first attempt at making a quilt, granted it is only an appliqued quilt which in my mind is much easier than what I think of as a more traditional quilt made by sewing little pieces of fabric together but I did quilt it which was huge for me. Stippling/quilting (not sure what the proper terminology is) is one of the things that I think makes a quilt a quilt and while my stippling was not perfect and definitely needs work, it was fun to do and it made me want to do more and improve.


For the monkey I free handed a drawing of a monkey hanging  from a tree branch and then cut  the drawing up into pieces for a pattern. I like the over all design of the quilt but looking at it now that it is finished, I wish I would have made the tree branch span across the entire quilt because as it is now, it just looks like the tree branch is floating in mid air which is a little weird.


The backing of the quilt is very cute, it is a bunch of little monkeys in different positions, with the words little monkey repeating. For the quilt top, I used a soft yellow with little white polka dots which are hard to see in the picture. It is all bound with a yellow and white striped fabric.


I am quite please with the quilt and it gave me the confidence I need to try my hand at a "real" quilt. I am thinking it will be a stacked coin quilt for my daughter. Wish me luck, especially since it will be a twin size quilt (this monkey quilt is a crib size) and I am going to try to quilt it myself.

Wednesday, May 18, 2011

Sailor Skirt for Me


Does anyone else have a fear of sewing clothing for themselves? I sure do! I'm not sure why, I guess it is just because I am afraid it won't turn out and I will have wasted time and fabric with nothing to show for it. Well today I decided to give it a try using some of the left over sheet I used to make these sailor pants for my daughter. I again turned to this tutorial from Me Sew Crazy for inspiration. I followed her tutorial for the sailor pants but instead made a sailor skirt.


To make the skirt, I simply used a skirt I love as a pattern and cut around it leaving extra for the seam allowance.  I then cut these pieces up the middle so that I had 4, 2 front and 2 back pieces just like in the tutorial. From here I followed the tutorial just as it is written to create the flaps for the sailor front.


For the back, I wanted a slit (I'm sure it has a technical name, I just don't know what it is) so I sewed the 2 back piece together stopping about 7 inches from the bottom. I then ironed the raw edges of the slit back 1/4 of an inch and sewed up one side of the slit and back down the other.


I then sewed all the pieces together and created the waist just like in the tutorial. The skirt turned out cute however my fear came true, I put the effort into making something for myself and it didn't fit. BOO! Which is why you are not seeing the skirt on me. I however know where I messed up and will give it another try, I just may have enough left for a take 2. Would you like to know where I messed up? Well, when I traced my skirt as a pattern, I added extra for the seam allowance for the side seam, I however didn't take into account the need to add in seam allowances for the seams that run up the middle of the front and back of the skirt.

I admit, not everything I make works or fits as the case may be. I however learned from this little mistake and will try again, this skirt is so cute, not to. What I need is a mannequin that is made to fit my body, I have seen tutorials on how to make them, I may just have to do that. I am determined to figure out how to sew clothes for myself. Have you had any failures when trying to sew something for yourself? Do you have any tips for me when trying to sew for yourself?  I'd love to hear about them.

Friday, March 25, 2011

Mickey Checkers


We are back from our surprise Disney World Vacation and what fun we had!!! I intended to post this last Mickey themed craft while on vacation but we were so busy having fun that, that didn't happen, so you get to see it now. It is a variation of the tic-tac-toe on the go game I posted a while back but instead of the game board being on the back of the game pouch, I had to make a separate fold-able game board because the checker board was just to big to fit onto the back of the pouch.


The game board was made by cutting out 1 inch squares of freezer paper using my favorite crafting tool the Silhouette Craft Cutter and then laying them out in the checker board pattern. I then ironed the freezer paper squares down on to a red fabric square which measured about 8 1/2 by 8 1/2 and used fabric paint to paint in the checker board. Once the paint was dry, I peeled off the freezer paper and where the freezer paper was the red fabric showed through leaving a perfect checker board. I then cut another piece of fabric the same size as the checker board and sewed them together and finished it off with a cute little fabric border.


For the game pieces I bought unfinished wood stars at Jo-ann's and painted them with acrylic paint. When they were dry, I added little Mickey and Friends stickers to one side of the stars and painted over the whole star with Modge Podge to seal.

The pouch or envelope to hold the whole thing was made by following this tutorial with one change, I didn't use the plastic on the front and back like in the tutorial, instead I used the plastic only on the front and used fabric on the back. The checker board is then folded and put inside the pouch along with the game pieces just waiting to be played with.

Monday, March 14, 2011

Ballerina Tutu Bag

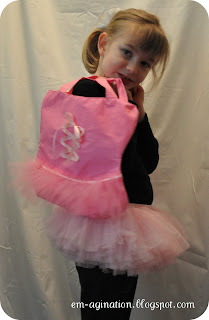
A few years ago a friend of mine was telling me about a bag she saw at one of her daughter Maya's ballet classes and after describing it to me she asked if I thought I could make it. I thought sure, I wish I had been able to look at the bag in person to get a better idea of what I would be making but she told me it was a bag that essentially looked like a little ballerina leotard with a tutu. With that description I set out to make a bag for Maya that looked like the one they had seen. My first attempt, I thought was very successful and it was wrapped up and delivered to cute little Maya for her birthday, never to be thought of again.  Fast forward to last week when I was cleaning/organizing  my stash and I came across 2 extra outer pieces I had cut for the bag and I remembered oh, that was a cute bag, I should make another one and blog about it so that is what I am doing.

I am sorry I don't have the time to write up a tutorial and post a pattern right now, we have a huge surprise brewing at our house this week that has taken up most of my time but I will if there is enough interest. So leave me  a comment if you would like a tutorial and I will contact you when it is ready or better yet, become a follower and then you will be sure not to miss it when it is done. Stop back by on Wednesday if you want to know what our super huge surprise is, there are a few crafts that are associated with it. Trust me it is a big one!

Sunday, March 6, 2011

Shirt to Shirt Refashion???

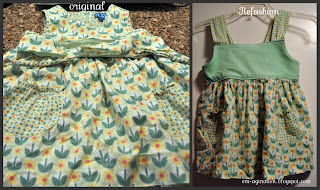
Refashion??? You be the judge, some may say no since this shirt refashion is very similar to the original it started out as, call it what you want, refashion or just repair doesn't matter because I love it and my daughter gets extended wear out of a very cute shirt.

Original shirt
So here is the story, my daughter received this shirt when she was 4 1/2 as a gift and I immediately fell in the love with it, loved the fabric, loved the color, loved the style. I however was very sad after just a few wearings my daughter got a huge rip in the front of the the shirt. I decided that even though she couldn't wear it in it's current state, I would put it into my "to do" pile and refashion it into a skirt. Well my daughter is now almost 8 and the shirt still sits in that same pile. "Procrastinator," yeah, that is my, I admit it. This weekend I was going through said pile and decided I needed to either do something with it or throw it out. It was definitely to short to become a skirt but I thought, I may be able to let out the gathered bottom a little and add a coordinating fabric in place of the ripped  fitted portion of the top and make it into a new top all together. Here is a little walk through on how this Children's Place shirt became this refashioned shirt.

First off you need to tear apart the existing shirt. I separated the gathered bottom from the fitted top. This shirt had a zipper which I also removed and saved for use in another project yet to be determined.

Next I used an existing shirt that fits to make a pattern for the fitted top cutting two pieces for the front of the shirt. Sorry I forgot to take  a picture of this step.

I then cut a long rectangle that is 5 inches in height by 1 1/2 times the length of the front pieces. Fold over one of the long sides of the rectangle 1/2 inch and sew down. Then start shirring the back rectangle. If you haven't shirred something before, here is a great tutorial on shirring by Ruffles and Stuff. 

Then you need to attach the back shirred piece to one of the front pieces at the sides, making sure that the right sides of the fabric are together. Then press open the seams. Pressing seams is very important, it makes the difference between a professional looking garment and a wonky looking garment.

Now take your second fitted top piece and the top piece with the shirred back attached and put right sides together. Sew these two pieces together along the curved arms and the chest area as shown by the dotted line, I added those lines, they are not the sewn stitch, pretty cool huh? Yeah, I thought so too.

With the pieces attached, clip your corners and snip the curves before you flip it right side out. This will help to made the pieces lay flat and the edges to look very square.


 With the top flipped so that the right sides are facing out, iron the fitted top part and top stitch around the curved arms and across the chess, making sure to leave the sides open.

This is what you should have so far.


Next take the gathered bottom of your original top and turn it inside out. Then turn your fitted top and turn it inside out and put it inside of the gathered bottom, pin and sew around so that you attach the two pieces, making sure that you only sew through one layer of the fitted top.

Turn the garment right side out and press this seam down. Now turn  it inside out again and press the bottom edge not attached to the gathered bottom and the sides under a 1/4 inch and sew these pieces down, making sure to capture the gathered edge under the turned edge so that the inside looks nice and neat..

Next I cut the tie back pieces off of the original shirt and used these as straps for the new shirt. Sew in place and you are done. You could add button if you want, I still may.

Put the dress on and step back and enjoy your work, Here is my cutie enjoying her shirt again. Please feel free to link back to this post but please don't use my pictures without permission, especially those with my children in them. I know these steps may be hard to follow so if you have any questions, don't hesitate to ask.


Wednesday, February 23, 2011

Bibs for your Baby


I know I have been posting a lot of baby stuff recently, kind of ironic considering my youngest is almost 6 but it just so happens that I know quite a few people who are having or have recently had a baby. I remember that when my kids were babies, bibs were always in short supply, they are constantly getting soiled with food or soaked through with drool. I know gross but you know what I mean. Knowing this I decided that a few handmade bibs would be a perfect little gift for my cousin who recently had a little boy. I however needed a bib pattern so I googled free bib patterns and came up with this very easy pattern from Chickpea Sewing Studio, a great first project if you are a beginning sewer. I tell you I love the Internet for free patterns, what a great resource. I however have hated sewing with knit fabrics because they always stretch and pucker and I have hated how they turned out but I read a tip recently about using a walking foot when sewing with knits. Can I tell you I have never been so excited, the knit fabric used for the bibs hardly stretched,  there was no puckering and everything laid very flat. With this little trick, I can not wait to sew with knits again, I will have to see what I can come up with using my "em-agination."

Thursday, February 17, 2011

Baby Hat with a Giant Flower (oh yeah)

To go with the itty bitty baby dress I decided that a hat was needed, not just any hat but a hat with a giant flower...they are all the rage right now and oh so cute. I used this little tutorial from Make it and Love it to make this hat but instead of the flower shown in the tutorial I made what I call a ruffle flower.
                                  
 This flower is really easy to make. Start by cutting a long rectangle of fabric, for this flower I cut a 2" by 18" strip of fabric but you can make it any size really, cut your rectangle longer if you want a fuller flower, cut it shorter if you want a less full flower.

Then sew three sides of the rectangle, the 2 short sides and one 18" side with a zig-zag stitch or a serger if you have one (stitch shown in red), this will help to keep the fabric from fraying.
On the side you haven't sewn you are going to sew a large basting/ruffle stitch to do this, set your machine's stitch length as high as it will go, my machine goes up to a 5 or five stitches per inch. You then are going to turn your tension up as high as it will go, my machine goes up to a 9. When you begin to sew your stitch, do not lock your stitch or reverse your stitch because you want to be able to pull on your thread ends when you are done to tighten your ruffles (again shown in red).
With the machine tension set to its highest setting and the stitches being so long, the fabric will being to automatically ruffle your fabric some. However to make the flower you want the ruffles to be very tight causing the fabric to begin to curl around itself in a sort of spiral.
When your ruffle is starting to spiral you will naturally see how if you lay the spirals on top of each other a flower will form, you can adjust how the layers lay to get a perfect flower.
Now using a needle and thread, tack all the layers together to prevent the flower from coming apart and attach to anything you wish, a hat, a pin, a headband, a belt, a scarf. Try layering several colors together for a multicolored flower or adding a jewel to the center for added flare, you are only limited by your "Em-agination."