Wednesday, May 4, 2011

Cookie Bouquets for Teacher Appreciation

My children have been very blessed to have some great teachers over the years and it is so important to me that we make sure they know how much we appreciate all they do not only for my children but for all the kids who come through their classroom. Teacher appreciation day is a perfect opportunity to let them know this and this year we chose to make cookie bouquets for my children's teachers.  This idea started when I found these cute little flower pots at Micheal's for $2.50 a piece. I thought that the white rim at the top would be a perfect place to add a little saying using my favorite crafting tool the Silhouette Craft Cutter. I cut a cute saying using self adhesive vinyl, it says, "Helping kids to grow" and filled it up with these cute little flower cookie pops.
I have made lots of cookie bouquets over the years simply because I love to give them as gifts but hate that they cost so much to buy so the frugal side of me came out and I thought to myself, you have to figure out how to make them so, I did. When I make these cookie pops, I always use this recipe, except instead of 2 tsp. of vanilla, I use 1 tsp. of vanilla and 1 tsp. of almond extract.

There are a couple of different ways in which to get the cookies onto the stick, they include, putting a little bit of royal icing onto the back of a cooked cookie and then adding a stick to the royal icing and letting it dry. I however prefer to  bake the stick right into the cookie. To do this I cut the cookie rather thick, 1/4 inch or so and then insert the stick in through the middle of the cookie . If the stick pokes out anywhere or if the dough looks thin, I just take a little of extra dough and push it in over the holes or thin areas of the cookie. I then bake the cookie as normal and when cool decorate, a skill that I am still trying to master. To decorate these cookies, I outlined the cookies forming a dam with a thick royal icing and then thinned the icing and filled in the dammed area with the thinned icing, this technique is most often referred to as flooding.

Once you are done decorating the cookies, let them dry several hours so that the icing has time to harden. When it is hard, you can wrap the cookies in a plastic bag and either tie the ends with a little bit of ribbon or do as I did above and twist the end of the bag around the stick and secure with a little bit of tape. Frugal tip: instead of buying special plastic bags, I often use cheap Ziploc bags from the dollar store and cut off the zip part of the bag, this is especially helpful when you are up late and have an especially big cookie that won't fit into the special bags you bought, not that that happened to me or anything.

To make the bouquet, I take Styrofoam and cut it to fit into the container I am using. I then cover the Styrofoam with a little bit of Spanish moss or some other form of filler and then insert the sticks. The Styrofoam is rigid enough to hold the cookie pops upright. These cookies also make great party favors for birthday parties and have become some what of a birthday tradition at our house. Here's to hoping my children's teachers like them and that they know how much we appreciate all they do.

Sunday, May 1, 2011

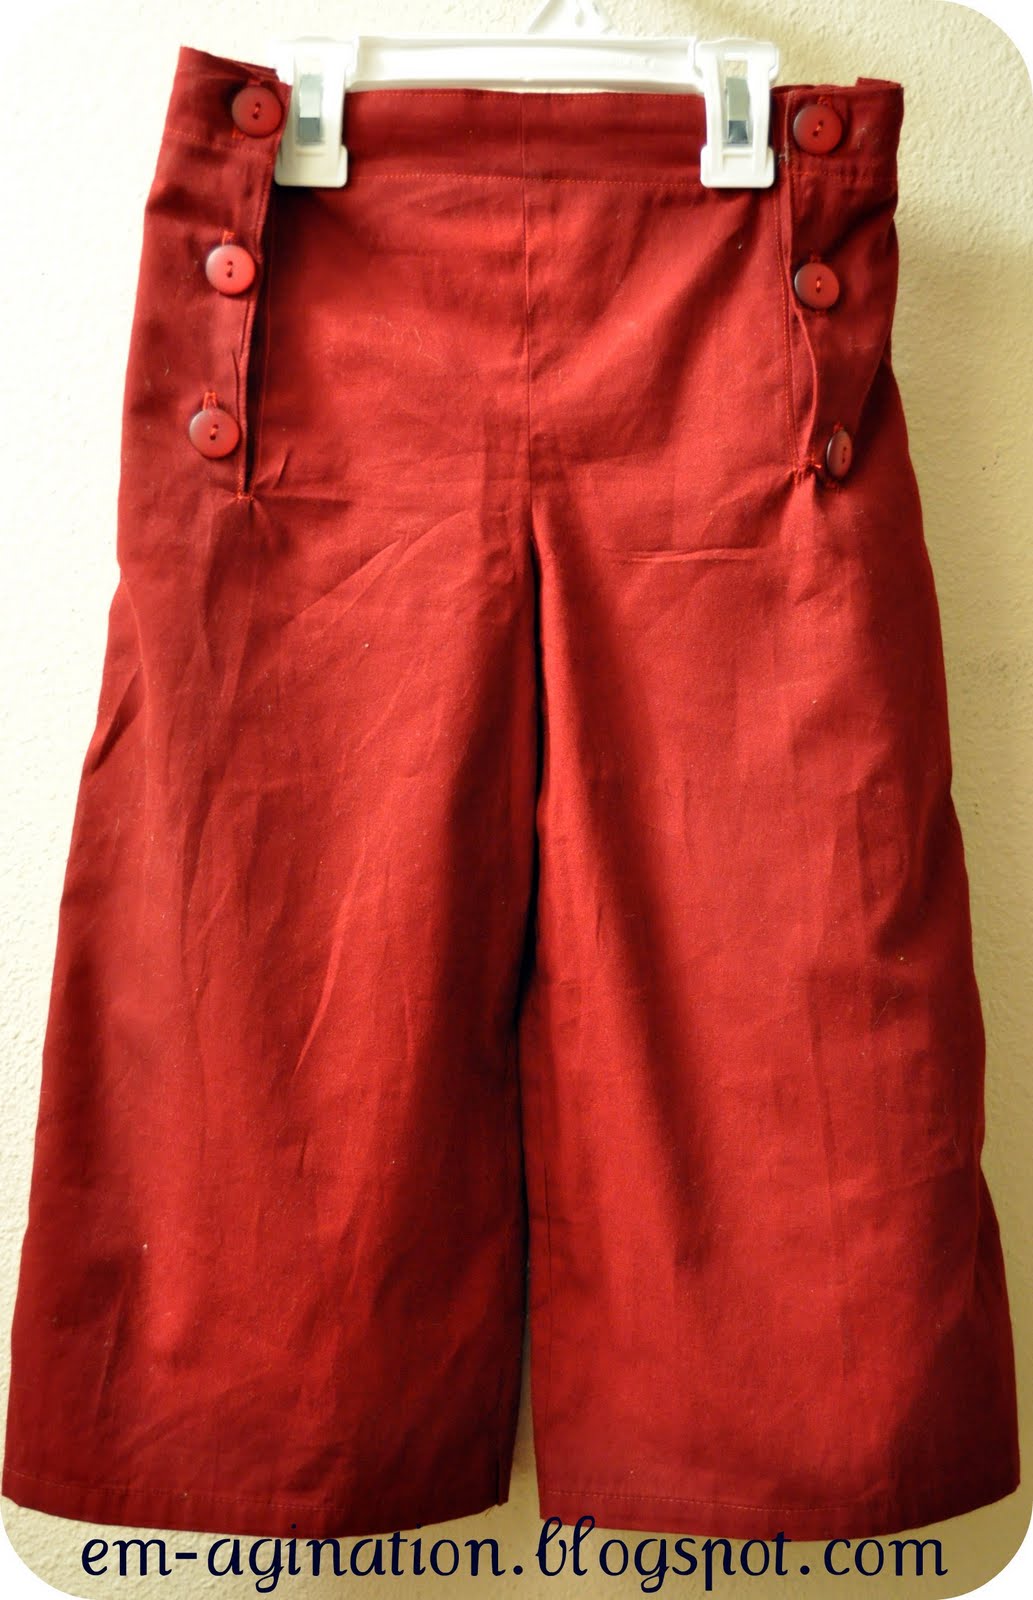
Sailor Pants with a Cherry on Top


Spring has finally arrived here in Oregon, we hit 70 degrees today and I am so happy to feel the warmth from the sun again. One thing that the warm weather made perfectly clear is that my daughter has grown a lot since last summer and is in dire need of spring/summer clothes. Being the frugal mama that I am, I decided to make her a few things using up some of my fabric stash.
Note to self: remember to iron before taking pictures to share with the world
First up was a pair of sailor pants that I absolutely love!  I used a wonderful tutorial that I found over at Me Sew Crazy to make these sailor pants. The tutorial is really great and very easy to follow, I'm thinking I may use this method to make a pair for myself. Don't tell anyone but I used a sheet that I picked up dirt cheap at Target a few months ago to make these pants. Actually do tell someone, sheets are a great frugal tip when it comes to sewing, I use them all the time. I just make sure to buy 400 thread count or higher so that the clothes I make with them aren't scratchy. Target quite often has them on sale for 4 or 5 dollars for a flat twin sheet and you get a lot of fabric for that price. With this sheet alone, I have made myself a bathing suit cover-up, these sailor pants and I have enough left to make a dress for my daughter, I will post that when I get it done.

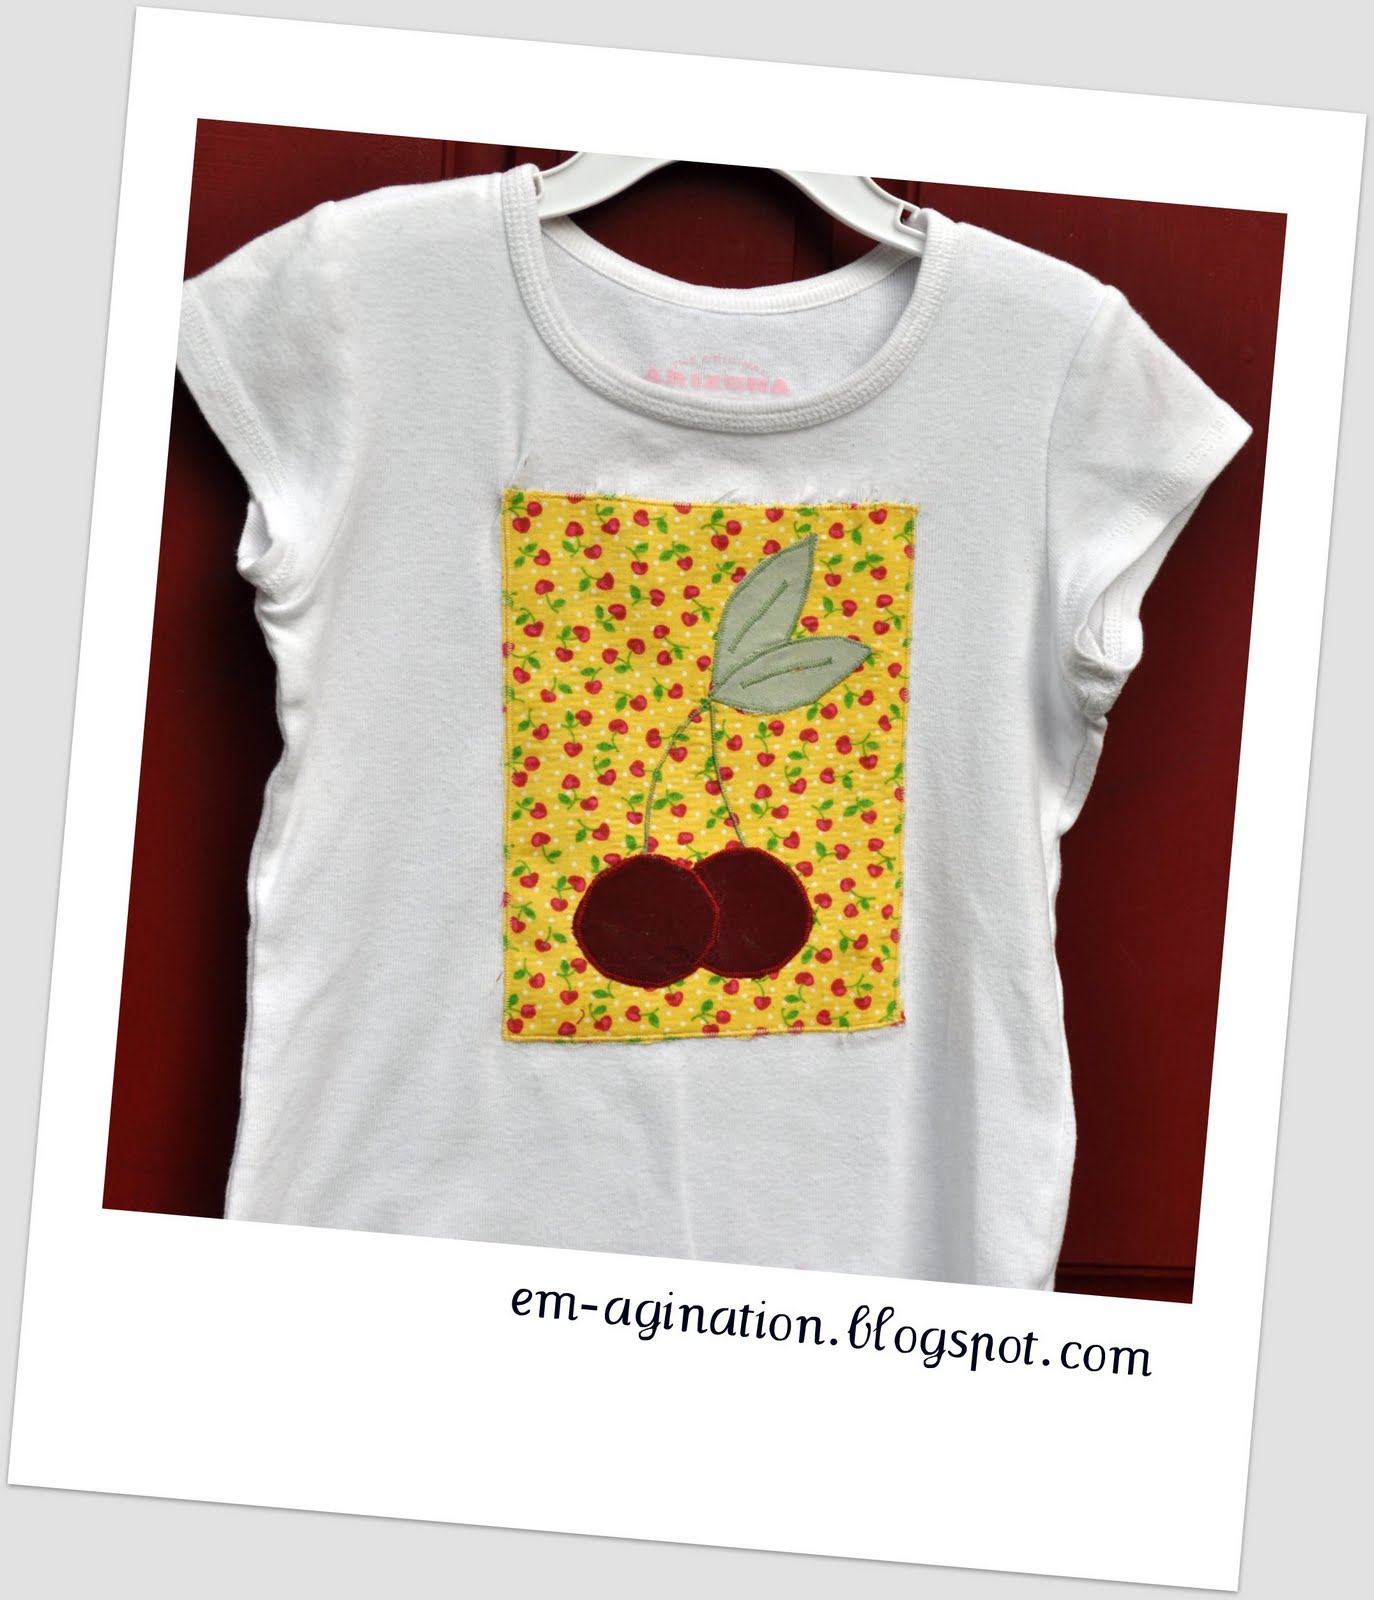
For the shirt, I used an existing plain white t-shirt in my daughter's closet that had a stain on the front. I cut out a rectangle of cute cherry fabric that I had left over from a skirt I made her a few years ago and appliqued on a couple of large cherries, that I free hand cut out of scraps. I then took the entire rectangle and appliqued it right over the stains on the t-shirt, good as new and pretty darn cute. The only complaint I have is, I wish I had remembered to back the shirt with a little bit of stabilizer because as I was sewing the applique onto the t-shirt, the fabric of the t-shirt pulled quite a bit and caused it to pucker quite a bit. Oh well lesson learned, at least I didn't learn this lesson on a new shirt.


Friday, April 29, 2011

Late to the Party???


Yes, I am late to the party. I am aware that Earth day was last Friday not today. I had the best of intentions to post this last Friday but life got in the way. However I thought this was such a good thing that I am going to go ahead and share it with you now, even if it is late. What is it? Well by now I assume a lot of us are bringing our own reusable shopping bags with us to the grocery store, but what about all those plastic bags we use when buying our fruits and vegetables? I know most people are still using the plastic bags provided at the grocery store and if you are anything like we are, they just get thrown away, they aren't good for anything else that I know of. I felt bad that it was such a waste so I got to thinking of a way to make a reusable produce bag and here is what I came up with. This idea is so simply and an idea that I am sure others have thought of so I am a little embarrassed to show it to you but if I thought it was cool and something very useful to help us cut down on waste, I am sure someone else will to so here you go, Reusable Produce Bags.

What you will need:
Tulle
ribbon or cording
thread

To make the bags cut out a rectangle of tulle that is 12 1/2 inches by 28 inches. Fold the bag in half so that you have a rectangle that measures 12 1/2 x 14 and sew up the side seams using a zig-zag stitch. I shortened my stitch length and width just to make sure I had a good solid seam.

Trim your threads and fold over the top about 1/2 to 3/4 of an inch and sew around the top again using a zig-zag stitch.

Trim your threads again and cut 2 small slits right next to each other, through one layer of tulle on the top hem you just created. This is so you can thread a ribbon or cording through and cinch it up so that none of your fruits and vegi's fall out.

Next heat the ends of your ribbon or cording using a lighter or match just until they begin to melt a little, this will keep the ends from fraying.

Then stick a safety pin through one end of the ribbon/cording and feed it through the small hole you just cut, going all the way around the top hem and coming out the hole right next to the one you went in through.

Tada!!! You are done and you bag is finished, go fill it up and feel good that you aren't wasting another plastic bag. An added bonus, you can wash your produce right in the bag since it is mesh the water will drain right out, making putting away my produce much faster. These bags were so easy and dirt cheap to make. out of 1 1/2 yards of tulle, I was able to make 8 bags. Using my 50% off Joann's coupon I was able to get the tulle for $1.12 which makes that bags roughly .14 cents a piece since I had the ribbon and cording already laying around from another project. Pretty cool and frugal if you ask me, even if it is a simple idea.

I was just thinking, how great would these be to give as a hostess gift or a house warming gift, alongside a couple of reusable shopping bags. A perfect easy, usable gift, the best kind and something I am going to do.

Thursday, April 28, 2011

Push-up Mold Giveaway-Second Time is a Charm

Unfortunately, I have tried several times to reach the original winner of the push-up molds and have heard nothing in return which means that I got to pick a new winner today, bummer for the original winner but yeah for the new winner....Lucky number 6


Seema said...


I'd love to win some of these! If I don't though, I may have to buy some! Too cute for words.

Well Seema, it is your lucky day because now you don't have to buy any, yeah!!! I will be sending you an email shortly to get your information.

Thanks again to everyone who played along. 

Tuesday, April 26, 2011

Anthropologie Bag Knock-Off


I was window shopping on the Anthropologie site a few days ago when I came across a handbag that caught my eye.

Image courtesy of http://www.anthropologie.com/
Anyone who knows me will laugh because I don't carry handbags, I have a little tiny coin purse that hangs from my car keys and that is all I carry. I travel light, what can I say. So for me to like a handbag is pretty rare but I was drawn to this one. I liked how soft/romantic this one looked. I liked how the handles of the bag were unique and I liked the lightness of the color/fabric. So I thought, why not try to make one and this is what I came up with, using all fabric from my stash. Yeah for stash busting!! This post will be long, so sorry, I tend to be long winded when I explain something, plus I forgot to take some pictures, oops.

Here is how I made this bag... I made this bag in two different sewing sessions and totally forgot to take pictures the second time I sat down to sew. Hopefully I will be able to walk you through without pictures. First off I cut out my fabric, not having I pattern, I looked at the bag and thought it looked a lot like a rectangle so that is where I started and here is what you will need to make a bag:

2 16 x 12 rectangles of outer fabric & stabilizer
2 16 x 12 rectangles of the liner fabric & stabilizer
(use a bowl to create rounded corners on two of the corners of the bag along one of the 16 inch sides of  both the outer fabric and liner fabric)
1 3 x 48 rectangle of outer fabric & stabilizer (outer side piece)
1 3 x 48 rectangle of liner fabric & stabilizer ( inner side piece)
2 4 x 8 rectangles of outer fabric (these will act as the hoops that hold the handles)
1 3 x 48 rectangle of contrasting fabric for handles & stabilizer
1 rectangle any size for pocket (optional)
10 3 x 12 rectangles of gauzy fabric

Once all of the pieces are cut out,  iron on the stabilizer to all the pieces indicated and lets get sewing. NOTE: all seams were done at 1/4 inch, unless indicated.

1. Pin the outer side piece around the curved edge of one of the large outer rectangles, leaving about 1 1/2 inches at the top of each side of the large rectangle, (your side rectangle may be too long and may need to be cut a little so that you have that gap at the top of each side of the bag, I had to cut mine, it is not a big deal) and sew. Once sewn, iron open your seam and turn right side out. This will become the front of your bag.

2. Now we need to make and attach the gauzy pieces to the front of the bag. To do this take two of your gauzy rectangles and make a cross with them.

3. Now pick up the piece that is underneath at both ends and pull up.

4. Grab the bottom piece with your other hand and pull, you will see that two loops or a knot are sort of formed.

5. Take this piece and pin it to the front piece of your bag starting at the bottom. Repeat this step 4 more times or until the front of your bag is covered. When full, sew along the edges of the front of the bag to secure the gauzy piece in place, making sure to leave the sides without the gauzy fabric.

6. When sewn and secure, cut the excess gauze from the bag, staying close to the line you just sewed. I then used a sewing needle and tacked the knotted middle piece to the bag just so they weren't floppy.

Here is where the pictures get sparse, so sorry.

7. Take the front piece you were just working on and flip the side pieces up, take you last large outer rectangle and pin, right sides together to the edge of the side piece which isn't already attached to the other large outer rectangle. Make sure that you are leaving that 1 1/2 inch gap at the top just like we did with the first large outer rectangle.

8. Iron open the seams and set the outer part of your bag aside.

9.  Create the lining of you bag just like we did the outer bag except skip the steps used to add the gauze detail to the front. Instead, you can add a pocket or pockets to your liner at this step if you want. To do this, I cut out a rectangle that was 4 x 8 1/2, folded it in half with right sides together and sewed along 3 sides. I clipped my corners and turned right sides out, ironing everything so it lays flat. Then fold over the open side 1/4 inch, iron and pin in place to the lining of the bag.  Top-stitch around three sides of the pocket so that you leave one side open to put stuff in.

10. Once liner is complete, set aside and let's make the loops for the handles to go through. First off create a finished edge on the 4 inch sides of the rectangle by folding over 1/4 inch on each side of the rectangle, iron and sew.


12. Repeat the last two steps so that you have two loops.

13. Now we need to join our bags together. Take you bag lining and turn it inside out if it isn't already. Then take your outer bag and turn it inside out and shove it into the bag lining. Make sure that all the seams line up and that everything is laying fairly flat.

14. Take one of your loops for the handles and sandwich it in between the bag liner and the outer bag along the side and up the 1 1/2 inch gaps you left at the top of the large rectangles, making sure that the raw edge of the loop matches up with the raw edges of the outer bag and bag liner, Pin into place.

15. Repeat step 14 on the other side of the bag.

16.  Sew along both sides just along where you sandwiched your loops.

17. Now for my favorite step, turning that bag right side out. You bag should be open along the top on both sides of the bag. Take your outer part of the bag and flip in right side out. Now flip your liner right side out and shove it inside of the outer bag. This should resemble the bag without handles. your sides should be sewn together and your tops left open.

18. Fold over the top of your outer bag an the top of your bag lining on both the front and the back and iron. Then top stitch around the whole top of the bag.

19. For the handles, you are going to fold  and iron your handle piece in half right sides together so that you have a rectangle that measures 1 1/2 x 48.

20. Sew along one 1 1/2 side and down the 48 inch side leaving one 1 1/2 side open for turning.

21. Turn your handle so that the right side is facing out and iron flat.

22. Insert your long handle rectangle through one of the loops on your bag and then through the other loop.

23. Decide how long you would like the handle to be and cut your handle to the according length.

24. With the two raw ends of your handles, fold the edges of one side into the loop so you create a finished edge...then insert your raw edge at the other end of the handle into this finished edge you just created and sew. You can then adjust your handle so the seam you just created is hidden inside of one of the loops.

So there you have it...if you have some knowledge of how to create a bag, this is a fairly easy bag to make. If you have any questions don't hesitate to ask. I know I may not have explained it well. I will get better at taking pictures, I promise. I just get so engrossed in what I am doing that I forget, oops.

All in all I like this bag and think it is a pretty good knock-off, I just wish I carried handbags so I could used it,  oh well, I guess I will have to find someone to give it to.


Saturday, April 23, 2011

Push-Up Mold Winner

I'm so excited to be doing my first give away here on "Em-agination" but before I reveal the lucky winner, I wanted to say thank you to all of you for the very nice comments regarding these push-up Popsicles and my blog in general. They really do mean a lot. Thanks also to those who featured these Popsicles this week and invited me to participate in  your blog parties, it all made for a very exciting week for me. It is the little things that excite me, (don't laugh.)

Now for the drum roll please...the lucky winner of the push-up molds is......
Just a note, there were 28 comments, I gave everyone one entry even though
they may have more than one comment on the post, thus making a pool of 24 entrants,
hopefully that makes sense
                                                     

nellana said...

I am a new follower and I love this idea. I really hope I win them. my hubby would love to eat these.

Nellana, I will be sending you an email shortly.
 If you didn't win and would like to purchase some, just shoot me an email christianandem(at)gmail(dot)com, they are $1.00 per mold plus the cost of shipping which I can quote when I know how many molds you would like to buy. Thanks again, Emily

Friday, April 22, 2011

Spring Moss Wreath


My name is Emily and I love wreaths, I admit it. Some people have shoe addictions, I think I have a wreath addiction. I love changing the wreaths on my front doors. Have you priced wreaths, they can be spendy but not this baby, this baby was made with things found at the dollar tree which means I made this wreath for about $5.00, not to bad huh.


For this wreath, I used a foam wreath form (say that three times fast) and covered it using some Spanish moss securing it to the wreath form using some floral pins.

I then added a little bit of reindeer moss to add some color. The wreath at this stage is very pretty and could easily be left as is but I couldn't leave well enough alone.


I decided I wanted to spruce it up some so I added a tiny nest with robin's eggs and some tiny blue bobbles. A perfect little spring wreath on a perfectly red door!